Table of Contents
Especificaciones
Xarxa
LACP
tplink TL-SG1024DE
https://www.tp-link.com/es/support/faq/991/?utm_medium=select-local
La IP del switch es 192.168.0.1. Nos ponemos un ip de ese rango (por ejemplo 192.168.0.2) y accedemos vía web:
admin/admin
Para configurar LACP vamos a System / switching / Port Trunk
Poner IP fija:
/etc/network/interfaces
allow-hotplug eno1
iface eno1 inet static
address 192.168.1.76
netmask 255.255.255.0
gateway 192.168.1.1
dns-nameservers 192.168.1.1 8.8.8.8 8.8.4.4
ILO
| Server | Server 1 (docker) | Server 2 (nas) | Server 3 | Server 4 (proxmox) |
|---|---|---|---|---|
| ILO | 192.168.1.21 | 192.168.1.22 | 192.168.1.23 | 192.168.1.24 |
| ILO | ippública:8081 | ippública:8082 | ippública:8083 | ippública:8084 |
| ILO | d0:bf:9c:45:dd:7e | d0:bf:9c:45:d8:b6 | d0:bf:9c:45:d4:ae | d0:bf:9c:45:d7:ce |
| ETH1 | d0:bf:9c:45:dd:7c OK | d0:bf:9c:45:d8:b4 | d0:bf:9c:45:d4:ac OK | d0:bf:9c:45:d7:cc ok |
| ETH2 | d0:bf:9c:45:dd:7d | d0:bf:9c:45:d8:b5 ok | d0:bf:9c:45:d4:ad | d0:bf:9c:45:d7:cd |
| RAM | 10GB (8+2) | 4Gb (2+2) | 16Gb (8+8) | 10Gb (8+2) |
| DISCO | 480Gb + 480Gb | 4x8TB | 480Gb + 480Gb | 1,8Tb + 3Gb |
| IP | 192.168.1.200 | 192.168.1.250 | 192.168.1.32 | 192.168.1.33 |
Usuario ILO ruth/C9
Configurar ILO
Al arrancar pulsar F8 (Ilo 4 Advanced press [F8] to configure)
Actualizar ILO
Descargar:
http://www.hpe.com/support/ilo4
Si es un exe, descomprimir y coger el bin. Se sube en la web de la ILO: overview / iLO Firmware Version
Agente ILO
Para ver mas info en la ILO como el disco duro, añadir a sources:
deb http://downloads.linux.hpe.com/SDR/repo/mcp stretch/current-gen9 non-free
apt-key adv --keyserver keyserver.ubuntu.com --recv-keys C208ADDE26C2B797
apt-get install hp-ams
BIOS
Tiene que tener instalado hp-ams para que detecte la ILO.
Yo lo he hecho con debian. Descargamos el software rpm de i386
Lo convertimos a deb. Lo instalamos:
dpkg --add-architecture i386
dpkg -i firmware-system-j06_2019.04.04-2.1_i386.deb
cd /usr/lib/i386-linux-gnu/firmware-system-j06-2019.04.04-1.1/
./hpsetup
Flash Engine Version: Linux-1.5.9.5-2

Name: Online ROM Flash Component for Linux - HP ProLiant MicroServer Gen8 (J06) Servers
New Version: 04/04/2019

Current Version: 06/06/2014

The software is installed but is not up to date.

Do you want to upgrade the software to a newer version (y/n) ?y

Flash in progress do not interrupt or your system may become unusable.
Working........................................................
The installation procedure completed successfully.

A reboot is required to finish the installation completely.
Do you want to reboot your system now? yes
NAS
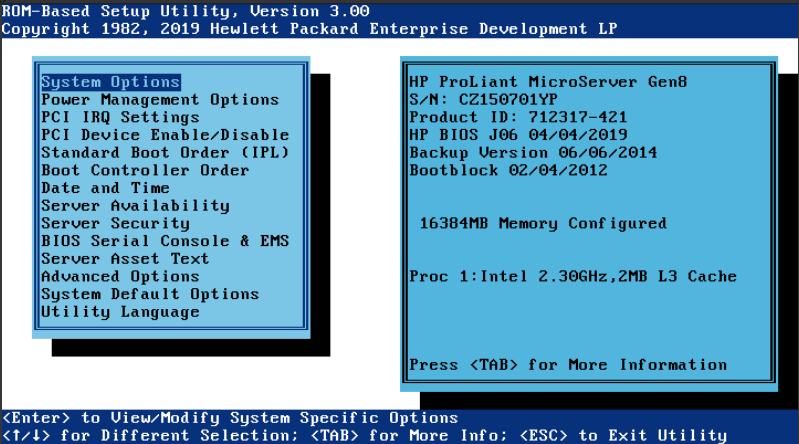
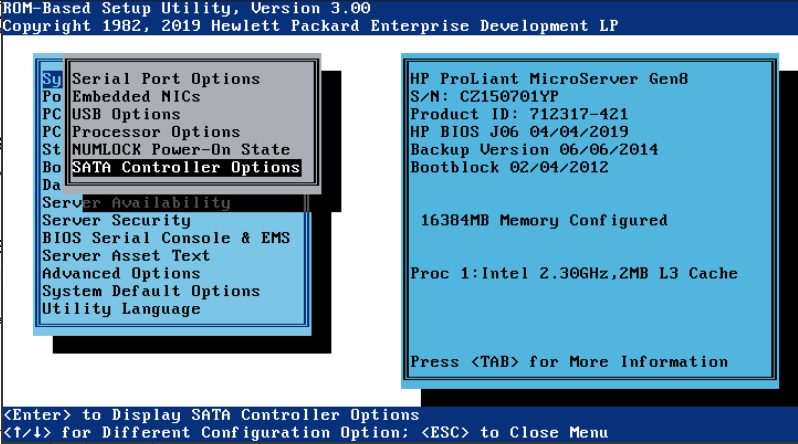
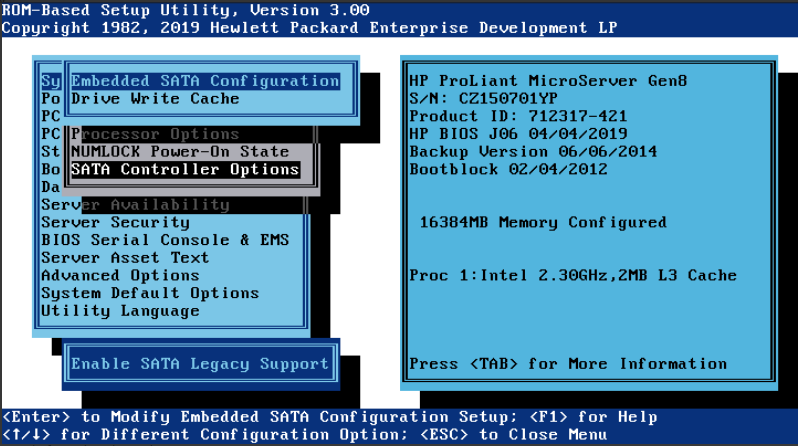
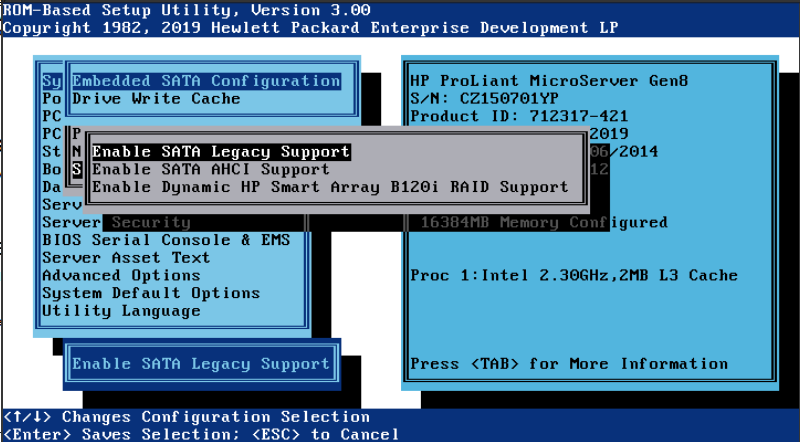
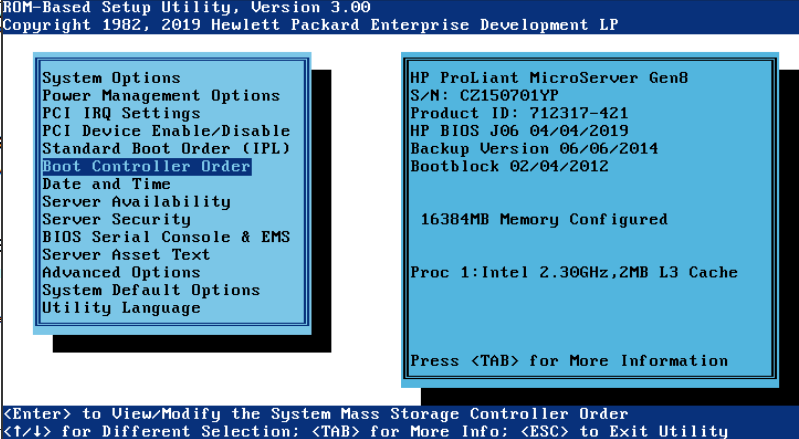
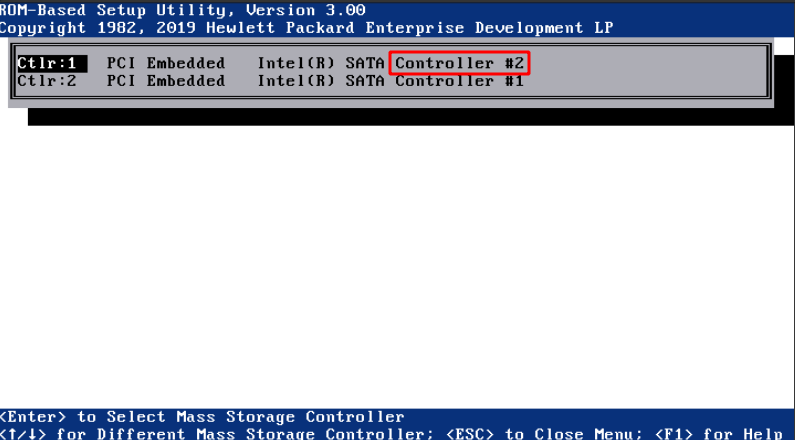
Para que arranque del SSD puesto en el CDROM hay que cambiar en la BIOS:
Pulsar F9 para etrar en BIOS
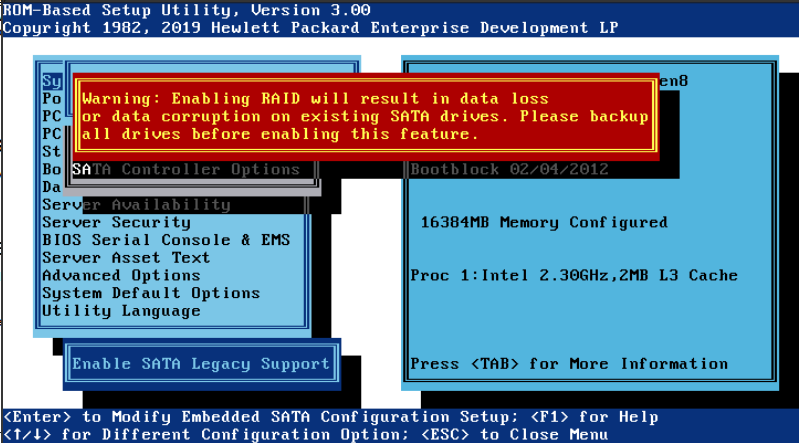
Cambiar a modo Legacy y el controller el 2, que es el CDROM en vez de los 4 discos
Configuración del RAID
Formatear los discos
Vemos como están las particiones:
fdisk -l
Disk /dev/sda: 7.3 TiB, 8001563222016 bytes, 15628053168 sectors
Disk model: ST8000DM004-2CX1
Units: sectors of 1 * 512 = 512 bytes
Sector size (logical/physical): 512 bytes / 4096 bytes
I/O size (minimum/optimal): 4096 bytes / 4096 bytes
Disklabel type: gpt
Disk identifier: 02ED88CD-1EBC-445B-89DB-6522BEB7EA03

Device     Start         End     Sectors  Size Type
/dev/sda1   2048 15628053134 15628051087  7.3T Linux RAID
Disk /dev/sdc: 7.3 TiB, 8001563222016 bytes, 15628053168 sectors
Disk model: ST8000DM004-2CX1
Units: sectors of 1 * 512 = 512 bytes
Sector size (logical/physical): 512 bytes / 4096 bytes
I/O size (minimum/optimal): 4096 bytes / 4096 bytes
Disk /dev/sde: 111.8 GiB, 120034123776 bytes, 234441648 sectors
Disk model: KINGSTON SA400S3
Units: sectors of 1 * 512 = 512 bytes
Sector size (logical/physical): 512 bytes / 512 bytes
I/O size (minimum/optimal): 512 bytes / 512 bytes
Disklabel type: dos
Disk identifier: 0x57311578

Device     Boot     Start       End   Sectors  Size Id Type
/dev/sde1  *         2048 200959999 200957952 95.8G 83 Linux
/dev/sde2       200962046 234440703  33478658   16G  5 Extended
/dev/sde5       200962048 234440703  33478656   16G 82 Linux swap / Solaris
Disk /dev/sdd: 7.3 TiB, 8001563222016 bytes, 15628053168 sectors
Disk model: ST8000DM004-2CX1
Units: sectors of 1 * 512 = 512 bytes
Sector size (logical/physical): 512 bytes / 4096 bytes
I/O size (minimum/optimal): 4096 bytes / 4096 bytes
Disk /dev/sdb: 7.3 TiB, 8001563222016 bytes, 15628053168 sectors
Disk model: ST8000DM004-2CX1
Units: sectors of 1 * 512 = 512 bytes
Sector size (logical/physical): 512 bytes / 4096 bytes
I/O size (minimum/optimal): 4096 bytes / 4096 bytes
Disk /dev/sdf: 29.3 GiB, 31444697088 bytes, 61415424 sectors
Disk model: Internal SD-CARD
Units: sectors of 1 * 512 = 512 bytes
Sector size (logical/physical): 512 bytes / 512 bytes
I/O size (minimum/optimal): 512 bytes / 512 bytes
Disklabel type: dos
Disk identifier: 0xeefb95d3

Device     Boot Start      End  Sectors  Size Id Type
/dev/sdf1  *    16384 61415423 61399040 29.3G 83 Linux
Tenemos 4 discos de 8Tb Tenemos que poner label GPT y crear una partición como linux raid
Creamos label GPT seleccionando g:
fdisk /dev/sda
Command (m for help): g
Created a new GPT disklabel (GUID: 99B4091D-BC19-D542-9331-B99666D7F464).
The old dos signature will be removed by a write command.
Ahora creamos la partición y luego modificamos a LINUX RAID
root@nas:~# fdisk /dev/sda
Welcome to fdisk (util-linux 2.33.1).
Changes will remain in memory only, until you decide to write them.
Be careful before using the write command.


Command (m for help): p
Disk /dev/sdd: 7.3 TiB, 8001563222016 bytes, 15628053168 sectors
Disk model: ST8000DM004-2CX1
Units: sectors of 1 * 512 = 512 bytes
Sector size (logical/physical): 512 bytes / 4096 bytes
I/O size (minimum/optimal): 4096 bytes / 4096 bytes
Disklabel type: gpt
Disk identifier: 99B4091D-BC19-D542-9331-B99666D7F464

Command (m for help): n
Partition number (1-128, default 1):
First sector (2048-15628053134, default 2048):
Last sector, +/-sectors or +/-size{K,M,G,T,P} (2048-15628053134, default 15628053134):

Created a new partition 1 of type 'Linux filesystem' and of size 7.3 TiB.

Command (m for help): t
Selected partition 1
Partition type (type L to list all types): 29
Changed type of partition 'Linux filesystem' to 'Linux RAID'.

Command (m for help): w
The partition table has been altered.
Calling ioctl() to re-read partition table.
Syncing disks.
Nos tienen que quedar así:
root@nas:~# blkid
/dev/sde1: UUID="d89fcee2-25a7-4c9f-a307-f84d9eb5269d" TYPE="ext4" PARTUUID="57311578-01"
/dev/sde5: UUID="ec8c87b5-7c08-4552-8c4a-189a29c0220c" TYPE="swap" PARTUUID="57311578-05"
/dev/sda1: UUID="fe89990a-d658-a1bc-0f69-c4cb06191398" UUID_SUB="c4914342-9da4-1485-cf6a-23fc22bb65cd" LABEL="nas:0" TYPE="linux_raid_member" PARTUUID="861fdab6-092b-554e-94ad-cc6904040338"
/dev/sdb1: UUID="fe89990a-d658-a1bc-0f69-c4cb06191398" UUID_SUB="6f3cad1b-1c99-f179-6aef-4b7944bff122" LABEL="nas:0" TYPE="linux_raid_member" PARTUUID="8b3890a4-39e0-9344-bf3c-2564f2178cf8"
/dev/sdc1: UUID="fe89990a-d658-a1bc-0f69-c4cb06191398" UUID_SUB="d8fa217c-cbb5-a06a-7282-2167bc504ca7" LABEL="nas:0" TYPE="linux_raid_member" PARTUUID="b6c7c5d5-ef51-574f-8932-46b7094af9c8"
/dev/sdd1: UUID="fe89990a-d658-a1bc-0f69-c4cb06191398" UUID_SUB="c0a4c476-0869-c721-1c41-cd0616840a41" LABEL="nas:0" TYPE="linux_raid_member" PARTUUID="e02f4317-a109-fd43-94fc-f68f28cf232a"
/dev/sdf1: LABEL="REAR-000" UUID="952ad047-3dd0-44f8-ad2a-61c2b6c324c7" SEC_TYPE="ext2" TYPE="ext3" PARTUUID="eefb95d3-01"
Crear el RAID
En este caso ya teníamos un RAID y primero hay que borrarlo porque se queda colgado:
root@nas:~# cat /proc/mdstat
Personalities : [linear] [multipath] [raid0] [raid1] [raid6] [raid5] [raid4] [raid10]
md127 : inactive sda1[0](S)
      7813893447 blocks super 1.2

unused devices: <none>
Lo borramos:
root@nas:~#  mdadm --stop /dev/md127
mdadm: stopped /dev/md127
Ahora si lo podemos crear:
root@nas:~# mdadm --create --verbose /dev/md0 --raid-devices=4 --level=raid5 /dev/sda1 /dev/sdb1 /dev/sdc1 /dev/sdd1
mdadm: layout defaults to left-symmetric
mdadm: layout defaults to left-symmetric
mdadm: chunk size defaults to 512K
mdadm: /dev/sda1 appears to be part of a raid array:
       level=raid5 devices=4 ctime=Wed Nov 25 15:41:12 2020
mdadm: size set to 7813893120K
mdadm: automatically enabling write-intent bitmap on large array
Continue creating array? y
mdadm: Defaulting to version 1.2 metadata
mdadm: array /dev/md0 started.
Montamos el RAID por UUID
blkid
/dev/md0: UUID="955edf36-f785-441e-95e6-ff7cd77fc510" TYPE="ext4"
/dev/sda1: UUID="ba93d654-1e00-4b85-b2f1-f9930af9cc43" UUID_SUB="f61e84e9-271d-a311-9ae4-6eca19a84c10" LABEL="nas:0" TYPE="linux_raid_member" PARTUUID="b638f829-b354-4953-9e08-f96c8f4f031d"
/dev/sdb1: UUID="ba93d654-1e00-4b85-b2f1-f9930af9cc43" UUID_SUB="6984a8d2-694a-b00b-0f23-809b2c123924" LABEL="nas:0" TYPE="linux_raid_member" PARTUUID="c9f7459b-cef8-434c-8a41-a471989eee60"
/dev/sdc1: UUID="ba93d654-1e00-4b85-b2f1-f9930af9cc43" UUID_SUB="12d795a6-a34e-feec-4c8f-6ad962a59536" LABEL="nas:0" TYPE="linux_raid_member" PARTUUID="eebd20a6-6f32-46a9-9015-adc50649514a"
/dev/sde1: UUID="a7edb0b3-d69b-43da-9dc6-66d046c4e344" TYPE="ext4" PARTUUID="c3c3e823-01"
/dev/sde5: UUID="b5c2a2a5-7217-4ab0-bdd9-55469ddcfaf9" TYPE="swap" PARTUUID="c3c3e823-05"
/dev/sdd1: UUID="ba93d654-1e00-4b85-b2f1-f9930af9cc43" UUID_SUB="cfd1a1fd-d4c7-a1f8-0779-c235b8784b5b" LABEL="nas:0" TYPE="linux_raid_member" PARTUUID="ca58c1f5-abc7-4b18-b5ae-f738788cb1ea"
/dev/sdf1: PARTUUID="0e2b0ddc-a8e9-11e9-a82e-d0bf9c45d8b4"
/dev/sdf2: LABEL="freenas-boot" UUID="15348038225366585637" UUID_SUB="12889063831144199016" TYPE="zfs_member" PARTUUID="0e4dff28-a8e9-11e9-a82e-d0bf9c45d8b4"
Ponemos en /etc/fstab
UUID=955edf36-f785-441e-95e6-ff7cd77fc510 /mnt/raid ext4 defaults 0 2
Desde 192.168.1.32
showmount -e 192.168.1.250
Export list for 192.168.1.250:
/mnt/dades/media 192.168.1.0
Montamos el recurso:
mkdir /nfs
mount 192.168.1.250:/mnt/dades/media /nfs
root@nas:/mnt/raid# apt-get install nfs-kernel-server
root@nas:/mnt/raid# cat /etc/exports /mnt/raid/nfs 192.168.1.0/255.255.255.0(rw,async,subtree_check,no_root_squash)
Reiniciamos el servicio root@nas:/mnt/raid# exportfs -rav exporting 192.168.1.0/255.255.255.0:/mnt/raid/nfs
En el cliente instalamos nfs: apt-get install nfs-common
Mostramos si lo ve root@avtp239:~# showmount -e 192.168.1.250 Export list for 192.168.1.250: /mnt/raid/nfs 192.168.1.0/255.255.255.0
Lo montamos root@avtp239:/mnt# mount -t nfs 192.168.1.250:/mnt/raid/nfs /mnt/nfs
Pruebas de recuperación
Recuperación Sistema Operativo
El disco de arranque es un disco sólido de 120Gb
El disco de recuperación es una microsd de 32Gb colocada internamente.
Formateamos la microsd con el LABEL: REAR-0000. Buscamos que disco es:
fdisk -l
Disk /dev/sda: 29.3 GiB, 31444697088 bytes, 61415424 sectors
Disk model: Internal SD-CARD
Units: sectors of 1 * 512 = 512 bytes
Sector size (logical/physical): 512 bytes / 512 bytes
I/O size (minimum/optimal): 512 bytes / 512 bytes
Disklabel type: dos
Disk identifier: 0xffbcc21c

Device     Boot Start      End  Sectors  Size Id Type
/dev/sda1  *    16384 61415423 61399040 29.3G 83 Linux
Lo formateamos:
rear format /dev/sda
USB device /dev/sda is not formatted with ext2/3/4 or btrfs filesystem
Type exactly 'Yes' to format /dev/sda with ext3 filesystem
(default 'No' timeout 300 seconds)
Yes
Vemos que lo ha creado correctamente:
blkid
/dev/sda1: LABEL="REAR-000" UUID="6065120e-3477-485d-9e99-84227f44a7d2" TYPE="ext3" PARTUUID="3c4e9100-01"
Vemos que está vacia
mount /dev/sda1 /mnt/sdcard/
ls /mnt/sdcard/
lost+found
Instalamos rear
apt-get install rear
Configuramos y excluimos la particion de /mnt/raid:
/etc/rear/local.conf
### write the rescue initramfs to USB and update the USB bootloader
OUTPUT=USB
### create a backup using the internal NETFS method, using 'tar'
BACKUP=NETFS
### write both rescue image and backup to the device labeled REAR-000
BACKUP_URL=usb:///dev/disk/by-label/REAR-000
Creamos backup que tarda unos 4 minutos. Si hemos montado la tarjeta, hay que desmontarla, nos sale un error dicíendolo:
rear -v mkbackup
Relax-and-Recover 2.4 / Git
Using log file: /var/log/rear/rear-nas.log
Using backup archive '/tmp/rear.W9D4MwcWoV2EzuJ/outputfs/rear/nas/20201108.1342/backup.tar.gz'
Creating disk layout
Using guessed bootloader 'EFI' (found in first bytes on /dev/sdb)
Creating root filesystem layout
Cannot include keyboard mappings (no keymaps default directory '')
Copying logfile /var/log/rear/rear-nas.log into initramfs as '/tmp/rear-nas-partial-2020-11-08T13:42:16+01:00.log'
Copying files and directories
Copying binaries and libraries
Copying kernel modules
Copying all files in /lib*/firmware/
Creating recovery/rescue system initramfs/initrd initrd.cgz with gzip default compression
Created initrd.cgz with gzip default compression (67642238 bytes) in 17 seconds
Saved /var/log/rear/rear-nas.log as rear/nas/20201108.1342/rear-nas.log
Copying resulting files to usb location
Saving /var/log/rear/rear-nas.log as rear-nas.log to usb location
Creating tar archive '/tmp/rear.W9D4MwcWoV2EzuJ/outputfs/rear/nas/20201108.1342/backup.tar.gz'
Archived 529 MiB [avg 5263 KiB/sec] OK
Archived 529 MiB in 104 seconds [avg 5212 KiB/sec]
Exiting rear mkbackup (PID 1753) and its descendant processes
Running exit tasks
Vemos que ha escrito en la tarjeta:
lost+found
boot
boot/syslinux
boot/syslinux/hdt.c32
boot/syslinux/ldlinux.c32
boot/syslinux/cat.c32
boot/syslinux/libgpl.c32
boot/syslinux/kbdmap.c32
boot/syslinux/sysdump.c32
boot/syslinux/chain.c32
boot/syslinux/lua.c32
boot/syslinux/cmd.c32
boot/syslinux/disk.c32
boot/syslinux/ldlinux.sys
boot/syslinux/reboot.c32
boot/syslinux/libmenu.c32
boot/syslinux/config.c32
boot/syslinux/libutil.c32
boot/syslinux/libcom32.c32
boot/syslinux/rosh.c32
boot/syslinux/menu.c32
boot/syslinux/ls.c32
boot/syslinux/vesamenu.c32
boot/syslinux/rear.help
boot/syslinux/message
boot/syslinux/host.c32
boot/syslinux/cpuid.c32
boot/syslinux/extlinux.conf
rear
rear/syslinux.cfg
rear/nas
rear/nas/20201108.1408
rear/nas/20201108.1408/initrd.cgz
rear/nas/20201108.1408/rear-nas.log
rear/nas/20201108.1408/backup.log
rear/nas/20201108.1408/syslinux.cfg
rear/nas/20201108.1408/kernel
rear/nas/20201108.1408/backup.tar.gz
nas
nas/rear-nas.log
nas/.lockfile
nas/VERSION
nas/README
Reiniciamos y arrancamos desde la tarjeta pulsando F11:

Seleccionamos la microsd, opción 3

Subimos en el menu de grub y seleccionamos Recovery images, en nuestro caso nas:

Seleccionamos el backup que nos interese si hay varios:

Cuando nos salga la pantalla de login, ponemos root (no nos pedirá contraseña) y luego rear recover
Pulsamos siempre 1) por defecto en todas las preguntas, al no ser que queremos hacer algún cambio, como los layouts, por si el disco destino es mas pequeño de tamaño.
Tarda un minuto
Cuando acabe, reiniciamos y ya lo tenemos recuperado.
Recuperación Raid
Tenemos 4 discos en RAID 5.
Miramos los discos que hay:
cat /proc/mdstat
Personalities : [raid6] [raid5] [raid4] [linear] [multipath] [raid0] [raid1] [raid10]
md0 : active raid5 sdb1[2] sda1[0] sdc1[1] sdd1[3]
      23441679360 blocks super 1.2 level 5, 512k chunk, algorithm 2 [4/4] [UUUU]
      [>....................]  resync =  3.5% (277980108/7813893120) finish=43149.1min speed=2910K/sec
      bitmap: 58/59 pages [232KB], 65536KB chunk

unused devices: <none>
Mas detalle:
mdadm --detail /dev/md0
/dev/md0:
           Version : 1.2
     Creation Time : Tue Sep 15 00:16:25 2020
        Raid Level : raid5
        Array Size : 23441679360 (22355.73 GiB 24004.28 GB)
     Used Dev Size : 7813893120 (7451.91 GiB 8001.43 GB)
      Raid Devices : 4
     Total Devices : 4
       Persistence : Superblock is persistent

     Intent Bitmap : Internal

       Update Time : Sun Nov  8 17:16:25 2020
             State : active, resyncing
    Active Devices : 4
   Working Devices : 4
    Failed Devices : 0
     Spare Devices : 0

            Layout : left-symmetric
        Chunk Size : 512K

Consistency Policy : bitmap

     Resync Status : 3% complete

              Name : nas:0  (local to host nas)
              UUID : ba93d654:1e004b85:b2f1f993:0af9cc43
            Events : 3722

    Number   Major   Minor   RaidDevice State
       0       8        1        0      active sync   /dev/sda1
       1       8       33        1      active sync   /dev/sdc1
       2       8       17        2      active sync   /dev/sdb1
       3       8       49        3      active sync   /dev/sdd1
Quitamos un disco a saco como si fallara:
cat /proc/mdstat
Personalities : [raid6] [raid5] [raid4] [linear] [multipath] [raid0] [raid1] [raid10]
md0 : active raid5 sdb1[2] sda1[0] sdc1[1]
      23441679360 blocks super 1.2 level 5, 512k chunk, algorithm 2 [4/3] [UUU_]
      bitmap: 58/59 pages [232KB], 65536KB chunk

unused devices: <none>
mdadm --detail /dev/md0
/dev/md0:
           Version : 1.2
     Creation Time : Tue Sep 15 00:16:25 2020
        Raid Level : raid5
        Array Size : 23441679360 (22355.73 GiB 24004.28 GB)
     Used Dev Size : 7813893120 (7451.91 GiB 8001.43 GB)
      Raid Devices : 4
     Total Devices : 3
       Persistence : Superblock is persistent

     Intent Bitmap : Internal

       Update Time : Sun Nov  8 17:28:03 2020
             State : clean, degraded
    Active Devices : 3
   Working Devices : 3
    Failed Devices : 0
     Spare Devices : 0

            Layout : left-symmetric
        Chunk Size : 512K

Consistency Policy : bitmap

              Name : nas:0  (local to host nas)
              UUID : ba93d654:1e004b85:b2f1f993:0af9cc43
            Events : 4069

    Number   Major   Minor   RaidDevice State
       0       8        1        0      active sync   /dev/sda1
       1       8       33        1      active sync   /dev/sdc1
       2       8       17        2      active sync   /dev/sdb1
       -       0        0        3      removed
Paramos el servidor y metemos el disco nuevo. Al arrancar está igual:
cat /proc/mdstat
Personalities : [raid6] [raid5] [raid4] [linear] [multipath] [raid0] [raid1] [raid10]
md0 : active raid5 sdb1[2] sda1[0] sdc1[1]
      23441679360 blocks super 1.2 level 5, 512k chunk, algorithm 2 [4/3] [UUU_]
      bitmap: 58/59 pages [232KB], 65536KB chunk

unused devices: <none>
mdadm --detail /dev/md0
/dev/md0:
           Version : 1.2
     Creation Time : Tue Sep 15 00:16:25 2020
        Raid Level : raid5
        Array Size : 23441679360 (22355.73 GiB 24004.28 GB)
     Used Dev Size : 7813893120 (7451.91 GiB 8001.43 GB)
      Raid Devices : 4
     Total Devices : 3
       Persistence : Superblock is persistent

     Intent Bitmap : Internal

       Update Time : Sun Nov  8 17:43:17 2020
             State : active, degraded
    Active Devices : 3
   Working Devices : 3
    Failed Devices : 0
     Spare Devices : 0

            Layout : left-symmetric
        Chunk Size : 512K

Consistency Policy : bitmap

              Name : nas:0  (local to host nas)
              UUID : ba93d654:1e004b85:b2f1f993:0af9cc43
            Events : 4236

    Number   Major   Minor   RaidDevice State
       0       8        1        0      active sync   /dev/sda1
       1       8       33        1      active sync   /dev/sdc1
       2       8       17        2      active sync   /dev/sdb1
       -       0        0        3      removed
Lo añadimos:
mdadm  /dev/md0 -a /dev/sdd
mdadm: added /dev/sdd
Vemos que hace el rebuild:
mdadm --detail /dev/md0
/dev/md0:
           Version : 1.2
     Creation Time : Tue Sep 15 00:16:25 2020
        Raid Level : raid5
        Array Size : 23441679360 (22355.73 GiB 24004.28 GB)
     Used Dev Size : 7813893120 (7451.91 GiB 8001.43 GB)
      Raid Devices : 4
     Total Devices : 4
       Persistence : Superblock is persistent

     Intent Bitmap : Internal

       Update Time : Sun Nov  8 17:47:59 2020
             State : active, degraded, recovering
    Active Devices : 3
   Working Devices : 4
    Failed Devices : 0
     Spare Devices : 1

            Layout : left-symmetric
        Chunk Size : 512K

Consistency Policy : bitmap

    Rebuild Status : 0% complete

              Name : nas:0  (local to host nas)
              UUID : ba93d654:1e004b85:b2f1f993:0af9cc43
            Events : 4454

    Number   Major   Minor   RaidDevice State
       0       8        1        0      active sync   /dev/sda1
       1       8       33        1      active sync   /dev/sdc1
       2       8       17        2      active sync   /dev/sdb1
       4       8       48        3      spare rebuilding   /dev/sdd
Al mirar el estado, indica que tardará 8.000 minutos (mas de 5 días) en sincronizar:
cat /proc/mdstat
Personalities : [raid6] [raid5] [raid4] [linear] [multipath] [raid0] [raid1] [raid10]
md0 : active raid5 sdd[4] sdb1[2] sda1[0] sdc1[1]
      23441679360 blocks super 1.2 level 5, 512k chunk, algorithm 2 [4/3] [UUU_]
      [>....................]  recovery =  0.0% (1023064/7813893120) finish=8019.4min speed=16236K/sec
      bitmap: 58/59 pages [232KB], 65536KB chunk

unused devices: <none>
Wake on lan (wakeonlan)
F9
Server Avalilability
Wake-On Lan
server 3
Para levantar un servidor, instalar el paquete wakeonlan y ejecutar con la mac de eth1:
wakeonlan <MAC>
Por ekemplo:
wakeonlan d0:bf:9c:45:dd:7c
Kubernetes
Instalar docker y cambiar driver cgroups
https://kubernetes.io/docs/setup/production-environment/container-runtimes/
https://kubernetes.io/docs/setup/production-environment/tools/kubeadm/install-kubeadm/
apt-get update && apt-get install -y apt-transport-https curl
curl -s https://packages.cloud.google.com/apt/doc/apt-key.gpg | apt-key add -
cat <<EOF >/etc/apt/sources.list.d/kubernetes.list
deb https://apt.kubernetes.io/ kubernetes-xenial main
EOF
apt-get update
apt-get install -y kubelet kubeadm kubectl
apt-mark hold kubelet kubeadm kubectl
root@kubernetes2:~# swapoff  -a
root@kubernetes2:~# kubeadm init
[init] Using Kubernetes version: v1.15.1
[preflight] Running pre-flight checks
	[WARNING IsDockerSystemdCheck]: detected "cgroupfs" as the Docker cgroup driver. The recommended driver is "systemd". Please follow the guide at https://kubernetes.io/docs/setup/cri/
[preflight] Pulling images required for setting up a Kubernetes cluster
[preflight] This might take a minute or two, depending on the speed of your internet connection
[preflight] You can also perform this action in beforehand using 'kubeadm config images pull'

[kubelet-start] Writing kubelet environment file with flags to file "/var/lib/kubelet/kubeadm-flags.env"
[kubelet-start] Writing kubelet configuration to file "/var/lib/kubelet/config.yaml"
[kubelet-start] Activating the kubelet service
[certs] Using certificateDir folder "/etc/kubernetes/pki"
[certs] Generating "ca" certificate and key
[certs] Generating "apiserver" certificate and key
[certs] apiserver serving cert is signed for DNS names [kubernetes2 kubernetes kubernetes.default kubernetes.default.svc kubernetes.default.svc.cluster.local] and IPs [10.96.0.1 192.168.1.32]
[certs] Generating "apiserver-kubelet-client" certificate and key
[certs] Generating "etcd/ca" certificate and key
[certs] Generating "apiserver-etcd-client" certificate and key
[certs] Generating "etcd/server" certificate and key
[certs] etcd/server serving cert is signed for DNS names [kubernetes2 localhost] and IPs [192.168.1.32 127.0.0.1 ::1]
[certs] Generating "etcd/peer" certificate and key
[certs] etcd/peer serving cert is signed for DNS names [kubernetes2 localhost] and IPs [192.168.1.32 127.0.0.1 ::1]
[certs] Generating "etcd/healthcheck-client" certificate and key
[certs] Generating "front-proxy-ca" certificate and key
[certs] Generating "front-proxy-client" certificate and key
[certs] Generating "sa" key and public key
[kubeconfig] Using kubeconfig folder "/etc/kubernetes"
[kubeconfig] Writing "admin.conf" kubeconfig file
[kubeconfig] Writing "kubelet.conf" kubeconfig file
[kubeconfig] Writing "controller-manager.conf" kubeconfig file
[kubeconfig] Writing "scheduler.conf" kubeconfig file
[control-plane] Using manifest folder "/etc/kubernetes/manifests"
[control-plane] Creating static Pod manifest for "kube-apiserver"
[control-plane] Creating static Pod manifest for "kube-controller-manager"
[control-plane] Creating static Pod manifest for "kube-scheduler"
[etcd] Creating static Pod manifest for local etcd in "/etc/kubernetes/manifests"
[wait-control-plane] Waiting for the kubelet to boot up the control plane as static Pods from directory "/etc/kubernetes/manifests". This can take up to 4m0s
[apiclient] All control plane components are healthy after 37.503359 seconds
[upload-config] Storing the configuration used in ConfigMap "kubeadm-config" in the "kube-system" Namespace
[kubelet] Creating a ConfigMap "kubelet-config-1.15" in namespace kube-system with the configuration for the kubelets in the cluster
[upload-certs] Skipping phase. Please see --upload-certs
[mark-control-plane] Marking the node kubernetes2 as control-plane by adding the label "node-role.kubernetes.io/master=''"
[mark-control-plane] Marking the node kubernetes2 as control-plane by adding the taints [node-role.kubernetes.io/master:NoSchedule]
[bootstrap-token] Using token: 5h71z5.tasjr0w0bvtauxpb
[bootstrap-token] Configuring bootstrap tokens, cluster-info ConfigMap, RBAC Roles
[bootstrap-token] configured RBAC rules to allow Node Bootstrap tokens to post CSRs in order for nodes to get long term certificate credentials
[bootstrap-token] configured RBAC rules to allow the csrapprover controller automatically approve CSRs from a Node Bootstrap Token
[bootstrap-token] configured RBAC rules to allow certificate rotation for all node client certificates in the cluster
[bootstrap-token] Creating the "cluster-info" ConfigMap in the "kube-public" namespace
[addons] Applied essential addon: CoreDNS
[addons] Applied essential addon: kube-proxy

Your Kubernetes control-plane has initialized successfully!

To start using your cluster, you need to run the following as a regular user:

  mkdir -p $HOME/.kube
  sudo cp -i /etc/kubernetes/admin.conf $HOME/.kube/config
  sudo chown $(id -u):$(id -g) $HOME/.kube/config

You should now deploy a pod network to the cluster.
Run "kubectl apply -f [podnetwork].yaml" with one of the options listed at:
  https://kubernetes.io/docs/concepts/cluster-administration/addons/

Then you can join any number of worker nodes by running the following on each as root:

kubeadm join 192.168.1.32:6443 --token 5h71z5.tasjr0w0bvtauxpb \
    --discovery-token-ca-cert-hash sha256:7d1ce467bfeb50df0023d439ef00b9597c3a140f5aa77ed089f7ee3fbee0d232
root@kubernetes2:~#
root@kubernetes2:~#
Desplegar una app:
https://kubernetes.io/docs/tutorials/kubernetes-basics/deploy-app/deploy-intro/
ruth@kubernetes2:~$ kubectl create deployment hello-node --image=gcr.io/hello-minikube-zero-install/hello-node
deployment.apps/hello-node created
ruth@kubernetes2:~$ kubectl get deployments
NAME         READY   UP-TO-DATE   AVAILABLE   AGE
hello-node   0/1     1            0           10s


ruth@kubernetes2:~$ kubectl get pods
NAME                          READY   STATUS    RESTARTS   AGE
hello-node-55b49fb9f8-fw2nh   1/1     Running   0          51s


ruth@kubernetes2:~$ kubectl get events
LAST SEEN   TYPE     REASON              OBJECT                             MESSAGE
73s         Normal   Scheduled           pod/hello-node-55b49fb9f8-fw2nh    Successfully assigned default/hello-node-55b49fb9f8-fw2nh to kubernetes3
72s         Normal   Pulling             pod/hello-node-55b49fb9f8-fw2nh    Pulling image "gcr.io/hello-minikube-zero-install/hello-node"
38s         Normal   Pulled              pod/hello-node-55b49fb9f8-fw2nh    Successfully pulled image "gcr.io/hello-minikube-zero-install/hello-node"
29s         Normal   Created             pod/hello-node-55b49fb9f8-fw2nh    Created container hello-node
29s         Normal   Started             pod/hello-node-55b49fb9f8-fw2nh    Started container hello-node
73s         Normal   SuccessfulCreate    replicaset/hello-node-55b49fb9f8   Created pod: hello-node-55b49fb9f8-fw2nh
73s         Normal   ScalingReplicaSet   deployment/hello-node              Scaled up replica set hello-node-55b49fb9f8 to 1

ruth@kubernetes2:~$ kubectl config view
apiVersion: v1
clusters:
- cluster:
    certificate-authority-data: DATA+OMITTED
    server: https://192.168.1.32:6443
  name: kubernetes
contexts:
- context:
    cluster: kubernetes
    user: kubernetes-admin
  name: kubernetes-admin@kubernetes
current-context: kubernetes-admin@kubernetes
kind: Config
preferences: {}
users:
- name: kubernetes-admin
  user:
    client-certificate-data: REDACTED
    client-key-data: REDACTED
Creamos un servicio:
ruth@kubernetes2:~$ kubectl expose deployment hello-node --type=LoadBalancer --port=8080
service/hello-node exposed
ruth@kubernetes2:~$ kubectl get services
NAME         TYPE           CLUSTER-IP     EXTERNAL-IP   PORT(S)          AGE
hello-node   LoadBalancer   10.99.215.55   <pending>     8080:32151/TCP   11s
kubernetes   ClusterIP      10.96.0.1      <none>        443/TCP          16h
Para borrarlo:
kubectl delete service hello-node
kubectl delete deployment hello-node
